

Salad for Breakfast
Salad for Breakfast
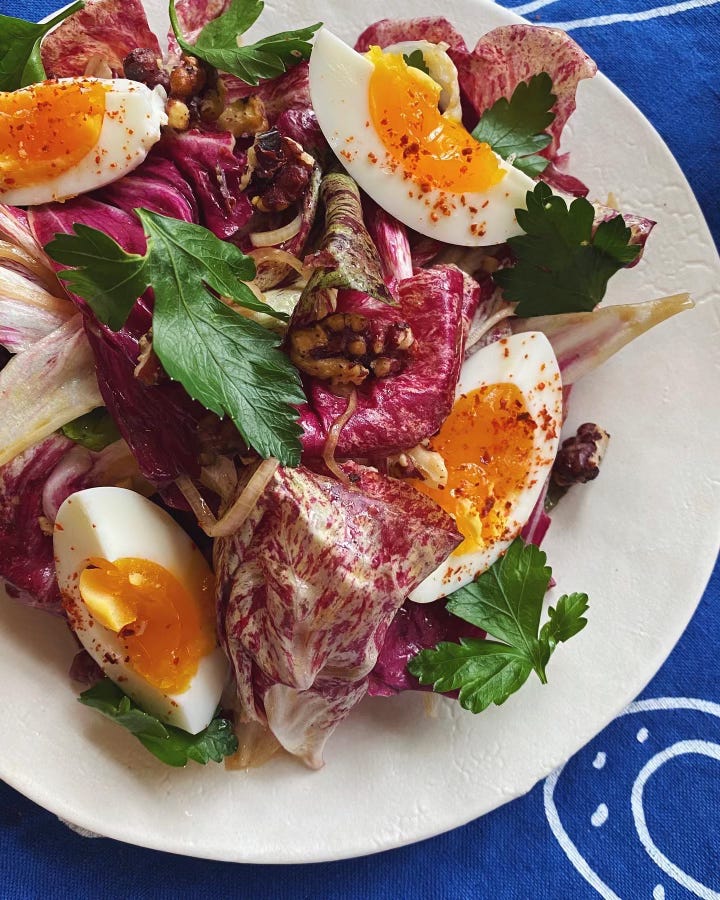
On eating your vegetables, dressing radicchio, toasting nuts in butter, and cooking perfectly jammy eggs

I’ve found myself in an increasingly co-dependent relationship with vegetables; the more I eat them, the more I crave them, the more it feels like its never enough. I’ll save waxing poetic about all the reasons why eating more than a reasonable amount of vegetables is essential for another time, today I’m here to share one of my favorite ways to eat (and prepare) my favorite vegetable of all: radicchio. This is not only a how to, but also a prescription for when to eat said vegetable (hint: the early bird gets the worm, or in this case - gets salad for breakfast).
Eggs are ubiquitously associated with breakfast food. Perhaps its their endless adaptability, or their economic appeal, or their nutritional reliability. Adding an egg can instantly nudge a dish into the satiating familiarity of breakfast time, especially when the menu calls for bitter greens. Such is the case for today’s salad: radicchio, an utterly questionable star for a morning meal, becomes perfectly palatable thanks to the inclusion of a golden, jammy egg. Butter toasted walnuts, a pickled shallot vinaigrette, and fresh parsley complete the meal.
On dressing radicchio
There’s a whole world of varieties of radicchio that range widely in color, texture, and pungency. What they all have in common is their unmistakeable bitterness. While different varieties certainly warrant different treatment, one fundamental tenet remains true among the whole family: radicchio’s assertive nature craves an equally assertive counterpart (read: a briney anchovy, pungent garlic, or in this case a pickled shallot) to temper the bitterness.
My general rule of thumb when dressing radicchio (unless I’ve got a particularly delicate variety on hand) is to dress the leaves more assertively than I would a tender leaf of lettuce. The sturdier the leaf, the more assertive you can be. You don’t want the leaves dripping, but make sure that the entire surface area of the vegetable is generously coated in whatever your choice vinaigrette might be.
As for the vinaigrette, you’ll find one of my personal favorites below - but beyond the recipe for this particular salad, the vinaigrette isn’t prescriptive. So long as you have good vinegar, good oil, and the right ratio between the two, you can easily concoct your own rendition. When dressing lettuce, I often lean on the classic 1 to 4 ratio (of vinegar to oil) - this plus a grind of pepper and a pinch of salt makes a delightfully simple vinaigrette. When dressing radicchio, I tend towards a ratio of 1 to 3 (assertive is still our theme!). If garlic or shallots are being used, I always (regardless of if I’m dressing radicchio or not) let them steep in the vinegar of choice for at least 5 minutes. This softens the punch of a raw allium, providing a mellower flavor and more ease on your gut. Mustard, honey, smoked chili flakes, citrus zest, dried herbs… these are all welcome additions for directing the flavor of your vinaigrette; mix and match according to the other flavors you’re trying to harness. If making a radicchio salad with apples and hazelnuts - consider making your vinaigrette with minced shallots macerated in a high quality apple cider vinegar, whole grain mustard, a touch of honey, and a pinch of heat. If making a radicchio salad to serve as the balancing foil for a steak dinner, consider taking a simpler, more punchy approach by macerating micro-planed garlic in red wine vinegar, adding the smallest pinch of dried oregano, and maybe a dribble of a concentrated balsamic to round out the acidity.
On toasting walnuts
Toasting nuts can easily be done with a sheet tray, a warm oven, and a timer (those nuts are too expensive for you to be so self assured) - but if you’re really after the sumptuous nature of a perfectly toasted nut, I recommend toasting them in a skillet set over low heat with a generous pat of butter. While this trick certainly isn’t necessary across the board, it provides especially impressive results when it comes to toasting walnuts. Walnuts are particularly astringent, and this astringency is often heightened from a trip to the oven. Toasting walnuts in a pan with the reinforcement of a protective layer of butterfat helps to counter that drying effect and ensures that the toasted nut has a succulent, luscious mouthfeel. This way of toasting requires more of your active attention, as you have to frequently toss the pan to ensure that the nuts toast evenly and most importantly - don’t burn. Once the walnuts are golden and aromatic, season them with a pinch of salt and a generous pinch of urfa chili flakes - then taste one to understand why I make the effort.
I buy red walnuts from Handy Farm (they ship!), mostly because I’m enamored by their beauty. If you’re going to go out of your way to acquire beautiful ingredients, take the time to prepare them in beautiful ways.
On boiling eggs
There are a couple of important things worth noting when it comes to boiling an egg. It’s generally recommended to boil eggs that have come to room temperature, in efforts to prevent the cold egg from exploding on contact with the boiling water. Considering that eggs are most often boiled (at least in my household) in the waking hours of the day, I often don’t have the patience or foresight to remove my eggs from the fridge in time. You can quickly bring cold eggs to room temperature by placing them in a bowl of warm water for 5 minutes, but if this too feels like an excess of effort - place the cold eggs in a mesh strainer and hold them just over the surface of the boiling water for 10 seconds. This quick hack helps the eggs to adjust to the dramatic shift in temperature that they’re about to endure. Next, no two eggs are exactly the same! Eggs vary greatly in size, especially if you’re sourcing them from a smaller farmer. Use your best judgment to determine how long they should boil—if they’re larger than average, cook for an extra 30 seconds; if they’re smaller than average, cook for 30 seconds less. Use this same judgment to adjust the cook time according to the ambient temperature of your egg - the colder the egg, the longer it’ll want to cook.
Beyond these little details, there is no definitively ‘right’ way to boil an egg. Multiple methods provide equally successful results, but here’s mine: bring a pot of water to a boil, then reduce the heat by a smidge to maintain a less ferocious boil. Transfer the cold eggs to a mesh strainer large enough to hold whatever quantity of eggs you’re boiling, then hover the eggs over the steaming pot of water to help counter the fridge’s chill. Gently lower the eggs into the water (if you’re boiling more than 6 eggs at a time, immediately place a lid on the pot once the eggs have been lowered in - this helps to account for the temperature drop from the volume of cold eggs and helps to quickly bring the water back to a boil), and then set a timer. 7 minutes will yield a jammy, fudgy yolk with cooked, just yielding whites - this is how I like my eggs. If you want a truly runny yolk (and barely set whites), cook the eggs for 6 minutes; if you want a hard boiled egg that hasn’t surrendered all of its buoyancy, cook the eggs for 10 minutes. While the eggs are boiling, prepare an ice bath in a bowl large enough to hold the eggs. Once your timer goes off, immediately transfer the eggs to the ice bath. This step not only quickly halts the cooking process, but also helps guarantee an easier peel.
Keep reading with a 7-day free trial
Subscribe to The Future is in Your Mouth to keep reading this post and get 7 days of free access to the full post archives.